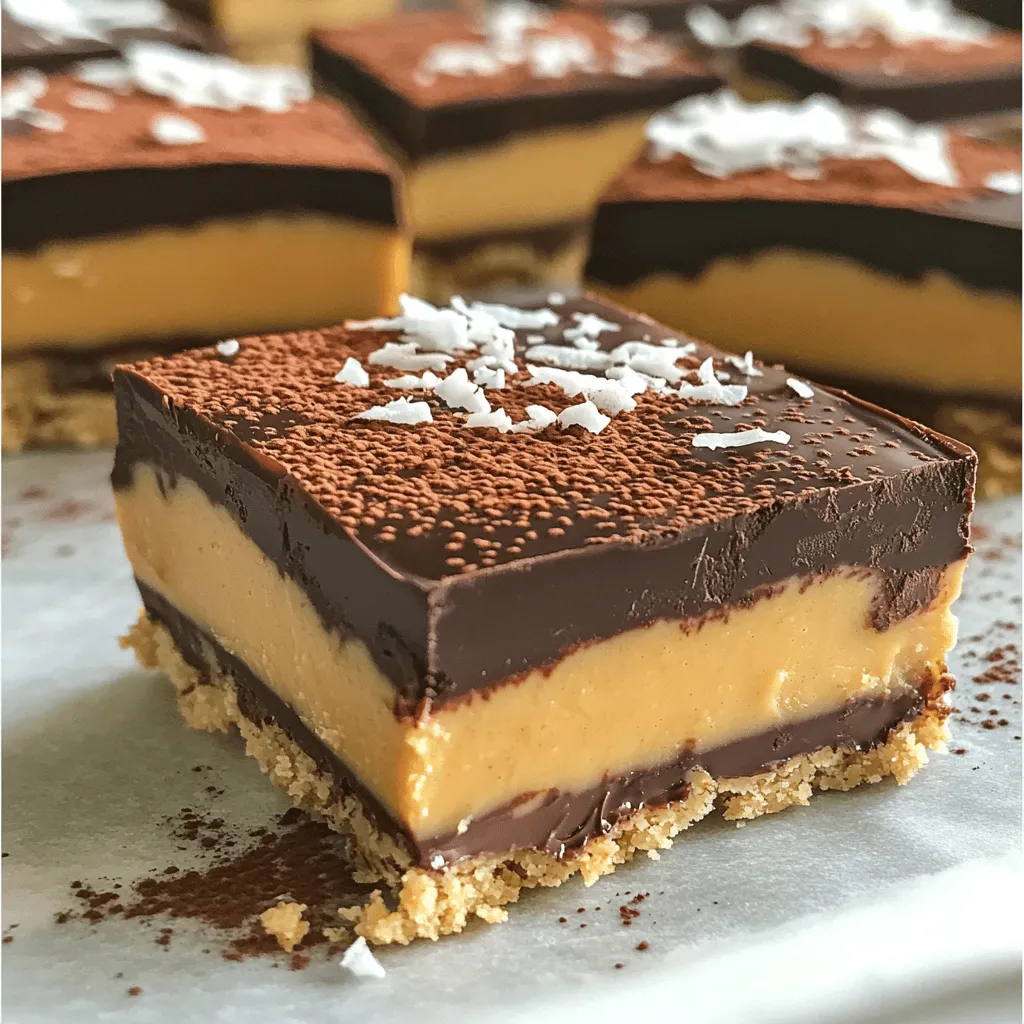
Craving a sweet treat that’s quick and easy? Let me introduce you to No-Bake Chocolate Peanut Butter Bars. This simple recipe is great for beginners, and it packs a rich, creamy flavor that everyone loves. You can whip these up in no time, if you follow my step-by-step guide. Plus, I’ll share tips to help you avoid common mistakes and customize these bars to fit your taste. Ready to indulge? Let’s get started!
Ingredients
List of Essential Ingredients
To make these no-bake chocolate peanut butter bars, you need a few key items:
– 1 cup creamy peanut butter
– 1 cup rolled oats
– 1/2 cup honey or maple syrup
– 1/2 cup cocoa powder
– 1/2 cup dark chocolate chips
– 1/4 teaspoon salt
– 1 teaspoon vanilla extract
These ingredients blend together to create a rich, tasty treat. The peanut butter brings creaminess, while the cocoa powder adds deep chocolate flavor.
Optional Ingredients for Customization
You can get creative with your bars! Here are some optional ingredients to try:
– 1/4 cup unsweetened shredded coconut
– Chopped nuts like almonds or walnuts
– Dried fruits such as raisins or cranberries
These additions can help you tailor the bars to your taste. Experiment to find your favorite mix!
Notes on Ingredient Quality
Using high-quality ingredients makes a big difference in flavor and texture. Here are some tips for selecting your ingredients:
– Peanut Butter: Choose natural peanut butter without added sugars or oils. It gives a pure taste.
– Honey or Maple Syrup: Go for raw honey or pure maple syrup for better flavor.
– Cocoa Powder: Look for unsweetened cocoa powder with a rich color for the best chocolate taste.
Quality ingredients will enhance your no-bake bars, making them even more delightful.
Step-by-Step Instructions
Preparation Overview
Making no-bake chocolate peanut butter bars is quick and easy. You only need about 15 minutes to prep. The bars will set in the fridge for about 2 hours. This recipe gives you 16 tasty bars.
Detailed Steps for Recipe Execution
1. Start by mixing your creamy peanut butter, honey (or maple syrup), and vanilla extract in a bowl. Stir until it’s smooth.
2. In a new bowl, sift together rolled oats, cocoa powder, and salt. Mix well.
3. Gradually add the dry mix to the peanut butter mix. Stir until everything is well combined. If you want, fold in the shredded coconut now.
4. Line an 8-inch by 8-inch baking dish with parchment paper. Leave some paper hanging over the sides for easy removal.
5. Spread the mixture into the dish. Press it down firmly to make it even.
6. Melt your dark chocolate chips in a microwave-safe bowl. Heat for 30 seconds at a time and stir until smooth.
7. Pour the melted chocolate over the peanut butter layer. Spread it evenly on top.
8. Pop the dish in the fridge. Let it chill for at least 2 hours until it sets.
9. Once set, lift the bars out using the parchment paper. Place them on a cutting board and cut into squares or rectangles.
10. Store any leftovers in an airtight container in the fridge for up to one week.
Highlighting Key Techniques
The key to this recipe is mixing well. Each ingredient must blend together for the best flavor and texture. Pressing the mixture firmly into the baking dish ensures the bars hold together. Melting the chocolate in short bursts keeps it smooth and prevents burning. For serving, a dusting of cocoa powder adds a nice touch and enhances presentation.
Tips & Tricks
Common Mistakes to Avoid
When making no-bake chocolate peanut butter bars, some common mistakes can ruin your treat.
– Not measuring correctly: Use measuring cups for accuracy. This affects taste and texture.
– Overmixing the peanut butter mixture: Mix just until smooth. Overmixing can make it too runny.
– Skipping the fridge time: Refrigerate the bars until set. This gives them the right firmness.
Enhancing Flavor and Texture
You can boost the flavor and texture of your bars with simple tweaks.
– Add a pinch of cinnamon: This adds warmth and depth to the taste.
– Use crunchy peanut butter: This gives a nice texture contrast.
– Mix in chopped nuts: Almonds or walnuts work well for added crunch.
Serving Suggestions
Presentation can make your bars even more appealing.
– Dust with cocoa powder: This adds a rich look and extra flavor.
– Top with sea salt: A sprinkle of sea salt balances the sweetness.
– Serve with fresh fruit: Sliced strawberries or bananas add freshness.

Variations
Alternative Flavor Combinations
You can switch up the flavors in these bars. For a twist, try almond butter instead of peanut butter. It gives a nice nutty taste. You could also use cashew butter for a creamier texture. Instead of cocoa powder, mix in some carob powder for a milder flavor. Adding a pinch of cinnamon can give the bars a warm spice that pairs well with chocolate.
Gluten-Free or Vegan Adaptations
These bars fit well into gluten-free diets. Just use gluten-free oats to keep it safe. For vegan options, replace honey with maple syrup. This keeps the sweetness but makes it plant-based. Ensure that your chocolate chips are dairy-free. This way, you can enjoy tasty treats without any animal products.
Creative Add-Ins
Get creative with add-ins for extra texture. Chopped nuts like almonds or walnuts add crunch. Dried fruits like raisins or cranberries can bring sweetness. You might want to sprinkle in some mini marshmallows for a fun twist. If you like a salty kick, add a few pretzel pieces. These add-ins can elevate your no-bake bars and make them even more delightful.
Storage Info
Best Practices for Storing Bars
To keep your no-bake chocolate peanut butter bars fresh, use an airtight container. This helps prevent them from drying out or absorbing other smells from the fridge. If you want to stack the bars, place parchment paper between layers. This way, they won’t stick together. Always store them in the fridge.
Shelf Life and Freezing Options
These bars last up to one week in the fridge. If you want to keep them longer, freeze them. To freeze, wrap each bar in plastic wrap and place them in a freezer bag. They can last up to three months in the freezer. When ready, let them thaw in the fridge for a few hours before enjoying.
Reheating Tips
You don’t need to reheat these bars. They taste best cold and firm. If the bars feel too hard after freezing, you can leave them out for a few minutes. This will soften them slightly, making them easier to bite into. Enjoy your sweet treat at the right temperature!
FAQs
How do you make No-Bake Chocolate Peanut Butter Bars?
To make No-Bake Chocolate Peanut Butter Bars, start by mixing the peanut butter, honey, and vanilla in a bowl. Then, in another bowl, sift together the oats, cocoa powder, and salt. Combine the two mixtures until smooth. Press this mix into a lined baking dish. Melt the dark chocolate and pour it over the top. After that, chill the bars in the fridge for about two hours until set.
Can I substitute ingredients in this recipe?
Yes, you can swap some ingredients! If you don’t have honey, use maple syrup instead. You can also use crunchy peanut butter if you prefer some texture. For a nut-free option, try sun butter. If you need a gluten-free version, use certified gluten-free oats. Feel free to get creative with flavors or textures!
What is the best way to cut No-Bake Chocolate Peanut Butter Bars?
To cut your bars, start by lifting them out of the dish using the parchment overhang. Place them on a cutting board. Use a sharp knife for clean cuts. If the bars feel too soft, let them chill a bit longer. For even pieces, score the top with a knife before cutting all the way through.
Now you know all about making No-Bake Chocolate Peanut Butter Bars. We covered the key ingredients and how to customize them for your taste. The step-by-step guide helps you make these tasty bars easily. I shared tips to avoid mistakes and improve flavor. You can also try fun variations and learn about storage.
In the end, these bars are a fun snack for everyone. Enjoy making them your way!